Prerequisites#
Before setting up Talos Linux, make sure you have the following:
- Compatible hardware: An old physical server, desktop, or any spare machine where you can install Talos Linux. (Alternatively, you can use a VM, but bare metal is often preferred for homelabs.)
- Bootable USB drive: An extra USB stick to create a Talos Linux boot medium. This will be used to install or boot into Talos on your target machine.
- Access to your home network: You’ll need access to your router or DHCP server in order to assign a static IP address to the machine running Talos.
- Basic networking knowledge: Comfort with concepts like IP addressing and DHCP reservations will make the setup easier.
Setup Bootable USB Drive#
We’ll use Ventoy to prepare a bootable USB drive. Ventoy is a powerful tool that allows you to copy multiple ISO images to a single USB stick and boot from them without reformatting.
Install Ventoy#
- Download Ventoy from the official release page.
- Plug in your USB drive (make sure to back up any important data — the setup will erase it). Once installed, your USB drive will be Ventoy-enabled.
Advantages of Ventoy#
- Multi-boot support: Store and boot multiple ISOs on a single USB stick.
- Easy updates: Just copy or delete ISO files, no need to recreate the boot media.
Install Suitable talos linux#
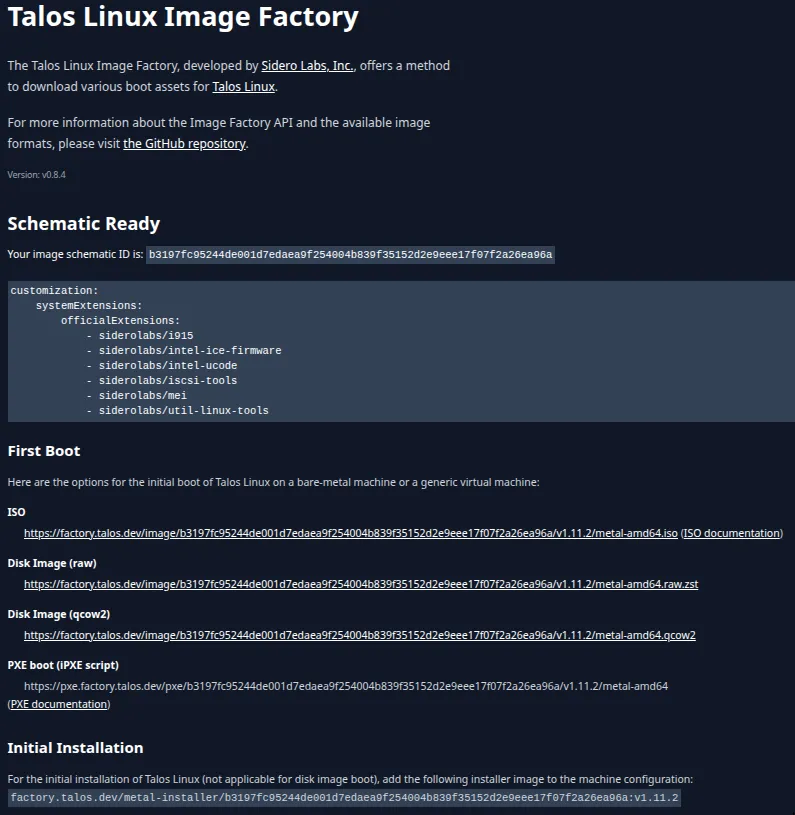
Talos Linux provides an Image Factory, an online tool that lets you build custom Talos images with specific system extensions included.
Steps#
- Go to the Talos Linux Image Factory.
- Select the base Talos Linux version you want to install.
- Add the following system extensions to ensure compatibility with your setup:
- Intel Based Systems
siderolabs/i915siderolabs/intel-ice-firmwaresiderolabs/intel-ucodesiderolabs/mei
- Longhorn Requirements
siderolabs/util-linux-toolssiderolabs/iscsi-tools
- Generate and download the image (ISO or disk image, depending on your target hardware).
- Copy the image to your Ventoy-enabled USB drive.
Booting Into Talos Linux#
When you boot the target machine with the Talos image:
- The system will start up and drop into maintenance mode.
- Maintenance mode is a temporary state that allows interactive access to the node for diagnostics and initial configuration.
- In this mode you can interact with Talos using
talosctlin an insecure way (without needing an authenticatedtalosconfig). This is only meant for setup or troubleshooting.
⚠️ Important: Once the system completes setup, Talos will no longer allow insecure access. From that point on, you must use a valid, authenticated talosconfig file for all API interactions.
Steps:#
1. List available disks on the control plane node#
export CONTROL_PLANE_IP="<Static IP of Node>"
talosctl get disks --insecure --nodes $CONTROL_PLANE_IP
This shows all disks. Identify the disk where Talos will be installed (e.g., nvme0n1).

2. Generate the Talos configuration file#
- After Getting
IDof disk, pass it toDISK_NAME
export CLUSTER_NAME="<Cluster Name (anything)>"
export DISK_NAME=nvme0n1
talosctl gen config $CLUSTER_NAME https://$CONTROL_PLANE_IP:6443 \
    --install-disk /dev/$DISK_NAME
- What Each Generated File Does ?
talosconfig-> The client configuration file that allowstalosctlto securely authenticate and manage Talos nodescontrolplane.yaml-> The machine configuration for your control plane node(s). Defines networking, disks, extensions, and cluster rolesworker.yaml-> The machine configuration for worker nodes that will join the cluster and run workloads.
3. Update controlplane.yaml for a Single-Node Cluster#
When running a single-node Talos cluster, you need to update the generated controlplane.yaml to reflect that this node will host both control plane and workload components.
Open the generated controlplane.yaml file.
- Enable
allowSchedulingOnControlPlanesfor allowing scheduling pods on control plane.cluster: allowSchedulingOnControlPlanes: true - Remove
node.kubernetes.io/exclude-from-external-load-balancerslabel for allowing external loadbalancer to send traffic to controlplane node.## Remove is this from controlplane.yaml machine: nodeLabels: node.kubernetes.io/exclude-from-external-load-balancers: - Update
imageand enablewipeflag for installation disk is completely wiped before Talos installs.- update
imagewith installer image shown in Image Factory,Initial Installation
machine: install: image: <Initial Installation - Installer Image> wipe: true - update
4. Apply the configuration to the control plane node.#
talosctl apply-config --insecure --nodes $CONTROL_PLANE_IP --file controlplane.yaml
5. Set the endpoint to the control plane node.#
talosctl --talosconfig=./talosconfig config endpoints $CONTROL_PLANE_IP
6. Bootstrap the etcd and control plane nodes.#
talosctl bootstrap --nodes $CONTROL_PLANE_IP --talosconfig=./talosconfig
7. Fetch Kubeconfig to local machine.#
talosctl kubeconfig --nodes $CONTROL_PLANE_IP --talosconfig=./talosconfig